Remote directly into desktops or Terminal Server
Introduction
University of Alberta (UofA) provides solutions to work remotely by connecting to your desktop computer on campus or working from the Terminal Server (TS) if you are on the central domain (sts.ad.ualberta.ca).
KBA Objective:
- Provides instructions for setup and connection for Remoting in desktops on Windows/MacOS/iOS/other Operating Systems (OS)
- Provides instructions for setup and connection for Terminal Server (TS) on Windows/MacOS/iOS/other Operating Systems (OS)
Applicability
Target Audience:
- Mainly for users under Central Domain (sts.ad.ualberta.ca)
- Instructions still apply for users outside of the central domain, but may be harder to understand
Non-applicable:
Procedure
Basic Information
Remote to desktops
Remote to Terminal Server (TS)
Appendix
Related Knowledge
Basic Information
Define Remoting into desktop
UofA desktop computers will always be connected through an ethernet cord to access the Internet through a hard-wired connection.
Once the computers get access to the UofA network, they can access drives, printers and policies that apply to the department.
Another benefit is that you can connect directly to your work computer by remoting in while you are off campus. The required conditions/process are:
From your work computer:
- Need to be connected through ethernet cord
- Network needs to be active (Network connections can drop and lose access to the computer)
- Full computer name (i.e. hostname + domain name)
From your remote computer:
- Need to access the network through VPN/gateway
- Need to set up the desktop/terminal connection on Remote Desktop Connection (RDC)
Define Terminal Server
Terminal Server (TS) is a Windows product that is popular in business/enterprise settings to provide basic access to shared drives and some of the applications available from a standard office computer.
Some users/departments can also have additional applications/access depending on their Active Directory (AD) accounts for their UofA computers.
The only condition is that only user accounts under the central domain can access TS.
Prerequisites on remoting with VPN
If you are off-campus or if you do not have access to a UofA ethernet connection (hard-wired internet), then you will need to access the UofA network remotely through a Virtual Private Network (VPN).
- VPN provides access to computers that are on and hard-wired on campus
- VPN provides basic access to a Windows computer using a remote session that is accessible for any account under the same domain as the connected domain
The typical application for UofA VPN is Cisco AnyConnect VPN. Please make sure that you have completed these steps before proceeding to remote into computers:
- If you are only planning to remote into Terminal Server (TS), check if your account is on the STS (central) domain
- Click on the Start menu
 of your computer and search for Cisco Anyconnect
- If you have Cisco Anyconnect VPN, you should see the following:
- If you do not have the application, please refer to KBA – Access the UofA VPN to follow the sections on installing Cisco AnyConnect VPN
- For connecting to computers under STS, refer to KBA – Connect to the @uanet VPN context for the instructions
- For connection to computers outside of STS, you will need a specific VPN context (instead of @uanet)
- If you do not know your department’s context, either ask coworkers or contact IST by calling 780-492-9400 or email ist@ualberta.ca for “the VPN context of my location”
You are all set for remoting into your UofA desktop computer or Terminal Server.
-
Note: Your desktop computer will need to be turned on and connected through ethernet to be accessible
Remote to desktops
1.0 Find your Windows computer name
You must know your computer name before you are able to connect remotely. These steps must be performed while physically at your office computer.
- If you are unable to gain physical access to your computer, please contact IST by calling 780-492-9400 or email ist@ualberta.ca for more assistance
- Click on the Start menu icon then open File Explorer
- Right click on This PC and click on Properties
- You should see the Full computer name for your UofA desktop computer. Write down that name as you will need this to connect from home
- Your full account username should follow the format: domain\username
If your account/computer is not under STS, your account should follow your computer as follows (e.g., for the Faculty of ALES):
- Full Computer name: COMPUTER_NAME.afhe.ualberta.ca
- Full Account Username: afhe.ualberta.ca\YOUR_CCID
2.0 Windows – Set up desktop connection
NOTE: Your work computer must be powered on and awake for you to connect direct to desktop.
-
Make sure to find your full computer name and full account username before proceeding, as mentioned in Section 1.0 of Remote to desktops
- Press the Windows Key + R, type mstsc and click OK to open the Remote Desktop Connection (RDC) window
- Click Show Options
- In the Remote Desktop Connection window, click on the Advanced tab
- Click Settings
- Apply the following settings in this window
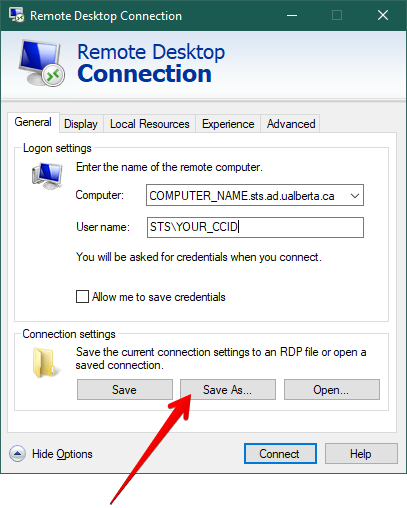
- In the Logon settings section of the General tab, fill in the following information:
- Click Save As… to name and save this configuration for later use
- Remember to pick a location you can easily remember and access

- Click Save to close the window or click Connect to connect to your work computer
2.1 Windows – Connect remotely to desktop
- Make sure that you are connected to the VPN, as mentioned in Prerequisites on remoting
- Open the RDC configuration that you saved in Section 2.0 of Remote to desktops
- If the Remote Desktop Connection window appears, click Connect
- Enter the password you use to access your work computer and click OK
- You are connected and you should see your work computer’s desktop on your screen and the Connection Bar will be visible
Remember to log off your work computer when finished:
3.0 MacOS (Apple) – Set up desktop connection
NOTE: Your work computer must be powered on and awake for you to connect direct to desktop.
-
Quit any applications that are running
- Click Command + Tab to scroll through your open applications
- Click Command + Q to close the selected application
- Download Microsoft Remote Desktop 10 from the App Store:
- Click on View in Mac App Store or Open App Store in the window that pops up
- When the page opens, click on Get to install
- After following any default instructions, your Applications folder will now contain a new application called Microsoft Remote Desktop
- To access your Applications folder, click on the Finder icon on the far left of your Dock
- When the window opens, click on Applications along the left side
Set Up desktop connection on macOS
Follow the instructions below to create a new connection:
- Make sure to find your full computer name and full account username before proceeding, as mentioned in Section 1.0 of Remote to desktops
- Open the Microsoft Remote Desktop application
- Press Command + N on your keyboard
- Enter the following information (ignore the Add Gateway):
- Leave the other settings as they are and click Add
- You will now see Work Computer listed in the Microsoft Remote Desktop window
- You will only need a VPN connect, then you can double-click it to connect
3.1 MacOS (Apple) – Connect remotely to desktop
- Make sure that you are connected to the VPN, as mentioned in Prerequisites on remoting
- Open Microsoft Remote Desktop that you saved in Section 3.0 of Remote to desktops
- In Microsoft Remote Desktop under PCs, double click on Work Computer
- A dialogue window may open asking you to verify the certificate, click Continue
- A dialogue window will open prompting you for your credentials. Enter the following information:
- You are connected and you should see your work computer’s desktop on your screen and the Connection Bar will be visible
Remember to log off your work computer when finished:
4.0 iOS (iPhone & iPad) – Remote to desktop
NOTE: Your work computer must be powered on and awake for you to connect direct to desktop.
Installing the Software on iOS
- Download and install Microsoft Remote Desktop 10 from the App Store:
Set up desktop connection
- Make sure to find your full computer name and full account username before proceeding, as mentioned in Section 1.0 of Remote to desktops
- Tap the Microsoft Remote Desktop Client icon on your device to launch it
- If prompted for access to Bluetooth or others, tap Continue and then tap OK for each request
- Tap + in the top right corner of the Microsoft Remote Desktop Client app
- Tap Add PC
- Enter the following information:
- PC Name: your_full_computer_name
- User Account: Ask When Required
- Friendly Name: Work Computer
- Back in the Add PC screen tap Save
- You will now see Work Computer listed in the RD Client window
Connect remotely to desktop
- Make sure that you are connected to the VPN, as mentioned in Prerequisites on remoting
- Tap the Microsoft Remote Desktop Client icon on your device to launch it
- Under PCs, tap on Work Computer to connect
- Enter the following into the dialog window that opened:
- You are connected and you should see your work computer’s desktop on your screen and the Connection Bar will be visible
Remember to log off your work computer when finished:
5.0 Other Operating Systems (OS)
NOTE: Your work computer must be powered on and awake for you to connect direct to desktop.
- Other operating systems (Android, Linux etc.) will require remote desktop client software. See your operating systems app store for more details.
- Make sure to find your full computer name and full account username before proceeding, as mentioned in Section 1.0 of Remote to desktops
- You will need to connect to the gateway.sts.ad.ualberta.ca gateway server or connect to the VPN as mentioned in Prerequisites on remoting
Your computer log in information is as follows:
- Username: full account username (domain\ccid)
- Password: your_Windows_password
When you are connected, you should see your work computer’s desktop on your screen and the Connection Bar will be visible
Remember to log off your work computer when finished:
Remote to Terminal Server (TS)
1.0 Windows – Set up TS
Note: TS is only accessible for users with STS accounts (mentioned in Define Terminal Server)
- Press the Windows Key + R, type mstsc and click OK to open the Remote Desktop Connection (RDC) window
- Click Show Options
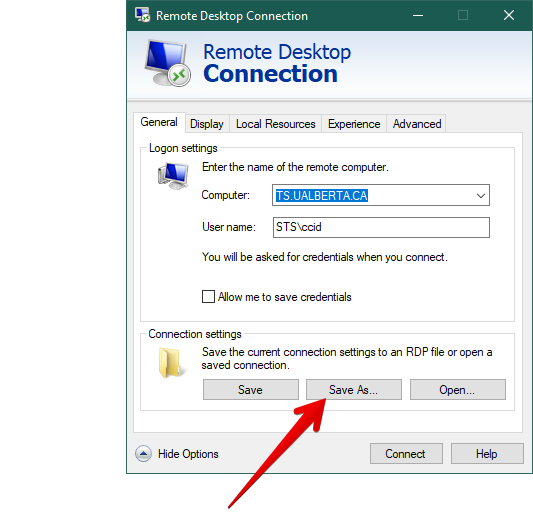
- Enter ts.ualberta.ca in the Computer field and STS\your_ccid in the User name field
- Click on the Advanced tab
- Click Settings
- Make sure, Automatically detect RD Gateway server settings is selected and click OK
- Click on the General Tab and then click Save As… to name and save this configuration for later use
- Remember to pick a location you can easily remember and access
-

- Click Save to close the window
1.1 Windows – Connect to TS
- Open the saved configurations mentioned in Section 1.0 of Remote to TS
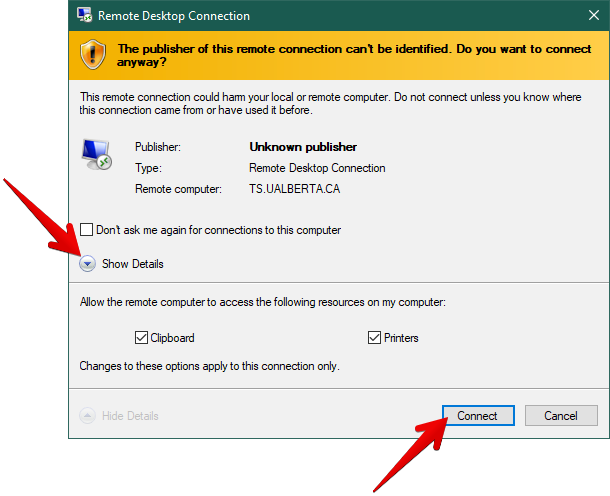
- If a warning message appears, click on Show Details to review what the remote computer will be able to access
- Once you are satisfied with your selections, click Connect
-

- Enter the password you use to access your work computer and click OK
- You are connected. You should now see your work computer’s desktop on your screen and the Connection Bar will be visible.
Remember to log off the terminal server when finished:
2.0 macOS (Apple) – Set up TS
Note: TS is only accessible for users with STS accounts (mentioned in Define Terminal Server)
- Quit any applications that are running
- Click Command + Tab to scroll through your open applications
- Click Command + Q to close the selected application
- Download Microsoft Remote Desktop 10 from the App Store:
- Refer to Apple – Microsoft Remote Desktop 10 for the download
- Click on View in Mac App Store or Open App Store in the window that pops up
- When the page opens, click on Get to install
- After following any default instructions, your Applications folder will now contain a new application called Microsoft Remote Desktop
- To access your Applications folder, click on the Finder icon on the far left of your Dock
- When the window opens, click on Applications along the left side
Set up Terminal Server Connection on macOS
- Follow the instructions below to create a new connection:
- Open the Microsoft Remote Desktop application
- Press Command + N on your keyboard
-
Enter the following information:
- You will now see University of Alberta listed in the Microsoft Remote Desktop window
2.1 MacOS (Apple) – Connect to TS
- Make sure that you are connected to the VPN, as mentioned in Prerequisites on remoting
- Open University of Alberta that you saved in Section 2.0 of Remote to TS
- A dialogue window will open prompting you for your credentials. Enter the following information:
- You are connected and you should see your work computer’s desktop on your screen and the Connection Bar will be visible
Remember to log off your work computer when finished:
3.0 iOS (iPhone & iPad) – Terminal Server
Note: TS is only accessible for users with STS accounts (mentioned in Define Terminal Server)
Installing the Software on iOS
-
Download and install Microsoft Remote Desktop 10 from the App Store:
Set Up Terminal Server Connection on iOS
- Tap the Microsoft Remote Desktop Client icon on your device to launch it
- If prompted for access to Bluetooth or others, tap Continue and then tap OK for each request
- Tap + in the top right corner of the Microsoft Remote Desktop Client app
- Tap Add PC
- Enter the following information:
- PC Name: ts.ualberta.ca
- User account: Ask when required
- Friendly name: University of Alberta
- Back in the Add PC screen tap Save
- You will now see University of Alberta listed in the RD Client window
Connect to Terminal Server on iOS
- Make sure that you are connected to the VPN, as mentioned in Prerequisites on remoting
- Tap the Microsoft Remote Desktop Client icon on your device to launch it
- Under PCs, tap on University of Alberta to connect
- Enter the following into the dialog window that opened:
- Username: : STS\your_ccid
- Password: Your work computer’s password
- You are connected and you should see your work computer’s desktop on your screen and the Connection Bar will be visible
Remember to log off your work computer when finished:
4.0 Other Operating Systems (OS) – Terminal Server
Note: TS is only accessible for users with STS accounts (mentioned in Define Terminal Server)
- Other operating systems (Android, Linux etc.) will require remote desktop client software. See your operating systems app store for more details.
- You will need to connect to the gateway.sts.ad.ualberta.ca gateway server or connect to the VPN as mentioned in Prerequisites on remoting
- The computer name is: ts.ualberta.ca
You will need to know your computer log in information:
- Username: STS\ccid (not case sensitive)
- Password: your_Windows_password
When you are connected, you should see your work computer’s desktop on your screen and the Connection Bar will be visible
Remember to log off your work computer when finished:
Appendix
Related Knowledge
Additional Considerations (Notes)
[n/a]
Back to Top
Keywords: terminal, server, central domain, AD, ad.ualberta.ca, STS, resources, home, remote, desktop, direct, ipad, ios, direct to desktop, gateway, VPFA, VPFO, AIS, ANCILLARY, EHS, EXTN, FO, FS, HRS, LAW, REO, RMS, RSO, SMS, UAPS, UR,