Access the University of Alberta VPN
Connect to Campus VPN
A VPN (Virtual Private Network) allows you to connect your computer or handheld device to the campus network when you are off-campus. You will need to connect to Campus VPN before you are able to use Terminal Server or Direct Connection.
** In the coming weeks, IST will update the VPN client to a new version. The name may show up as Cisco Secure Client instead of Cisco AnyConnect. The screenshots below still reflect the old version and will be updated soon after the new version is fully deployed. **
Important: An active Relationship To Institution (RTI) is required for the Campus VPN to function. If you do not have an active RTI then authentication will fail. All current students, employees and guests with a CCID should have an active RTI. If you are alumni or a contractor with an expired contract, then an active RTI may not be present. If you are not sure if you have an active RTI, please contact the Staff Service Centre
Requirements
Cisco AnyConnect VPN client
A link to the Cisco AnyConnect VPN client from IST will be provided in the first step of the set-up instructions. If you are confident in your knowledge of VPN systems, you may download and configure a VPN client of your choice. Please note that IST will only be able to provide best-effort support for other VPN clients.
Downloads
Once the client is installed, point it to vpn.ualberta.ca, and login with your CCID and password.
*You may need administrator privileges on your computer in order to install this software.
A computer or handheld device running:
Windows
Install Cisco AnyConnect VPN
- Download the Cisco AnyConnect VPN client from IST by clicking here.
- Double-click the installation file you downloaded in the Requirements Section.
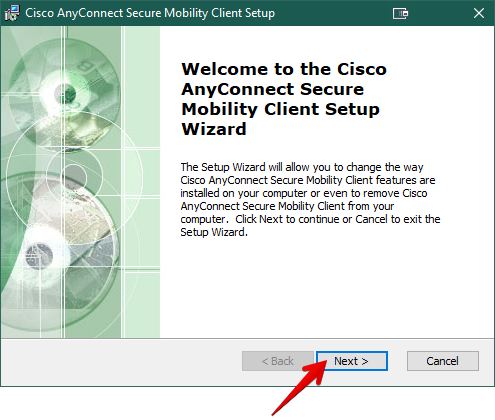
- Then the Cisco AnyConnect Secure Mobility setup screen appears, click Next.
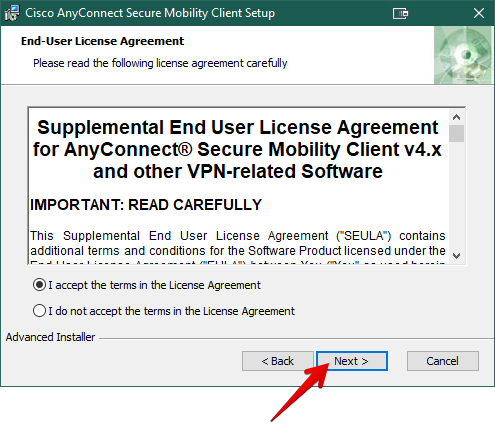
- Read carefully and accept the Cisco license agreement, then click Next.
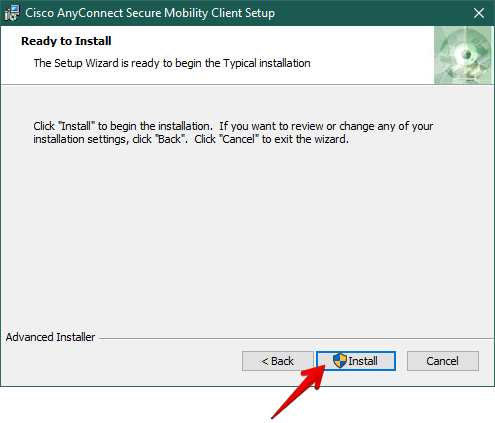
- Click Install.
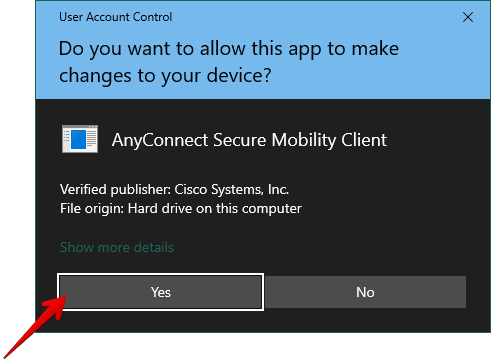
- If prompted, click Yes to authorize changes to your computer.
- The installation will proceed.
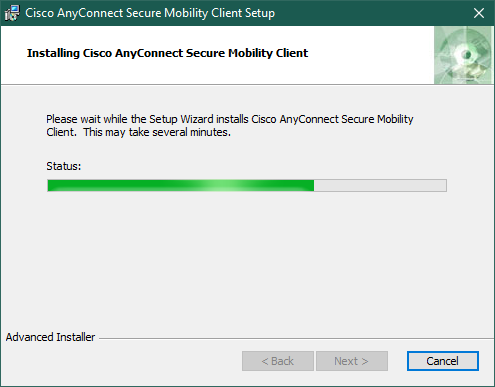
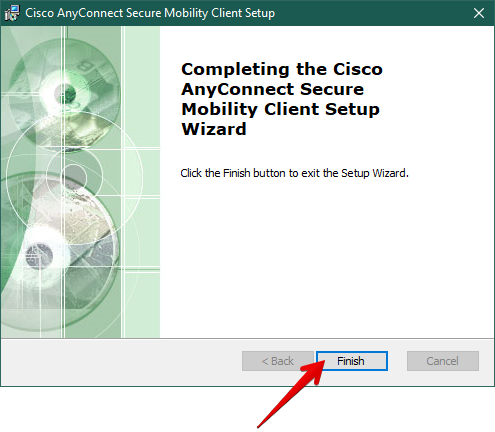
- Click Finish to finish the installation.
Connect
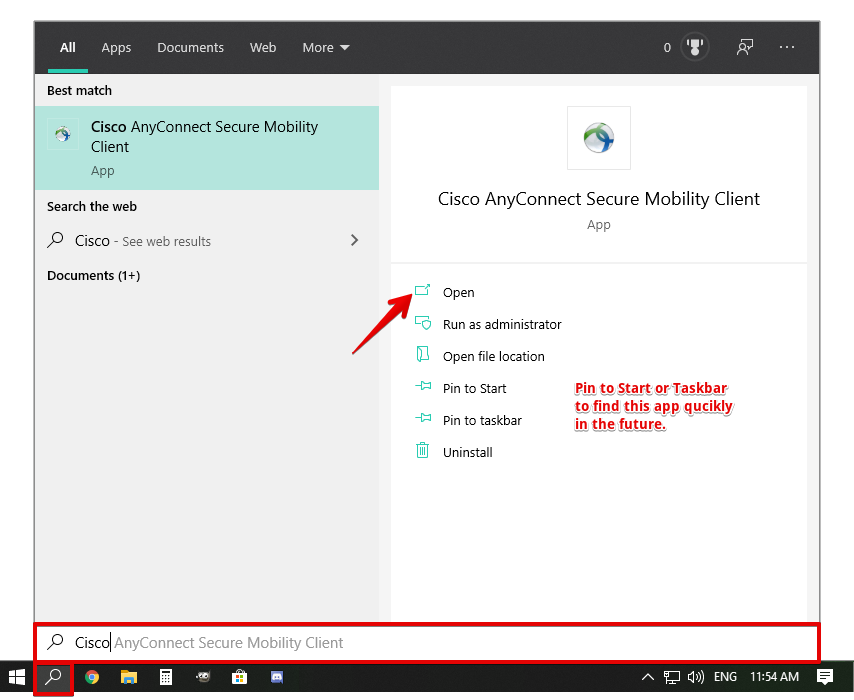
- Click on the magnifying glass icon and begin typing, Cisco AnyConnect Secure Mobility Client. When the application is found, click on, Open.
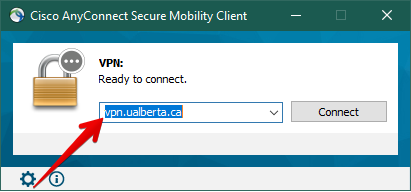
- If empty, type, vpn.ualberta.ca, in the Cisco AnyConnect Secure Mobility Client dialog box. Otherwise click Connect.
- Enter your CCID and password, and click OK.
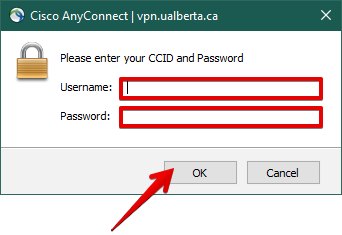
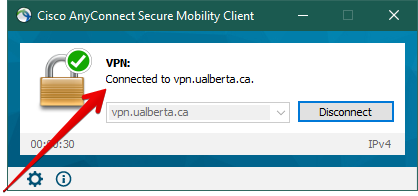
- Once you are connected, the window will display the message, Connected to vpn.ualberta.ca.
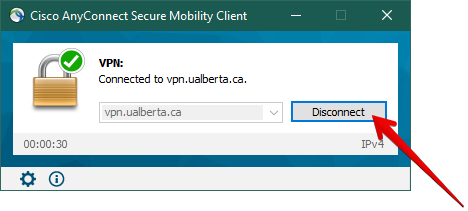
- Remember to disconnect when you are finished. To disconnect, click on the Disconnect button.
Mac OS X
Install Cisco AnyConnect VPN
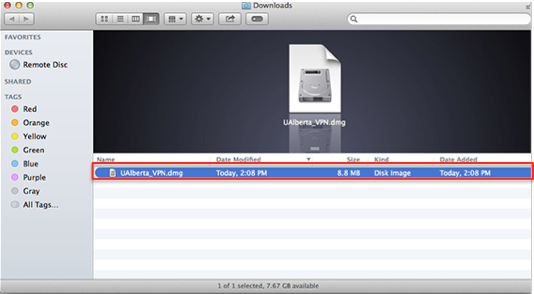
- Download Cisco AnyConnect VPN client from IST then select, Show in Finder.
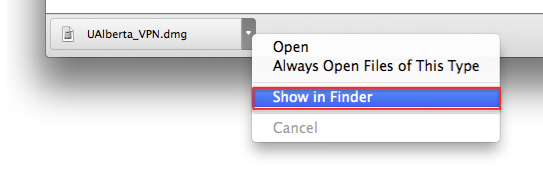
- Locate, and double-click the downloaded .dmg file in Finder.
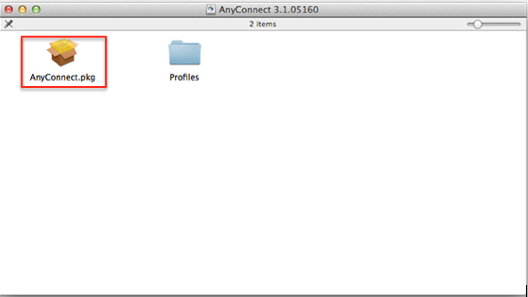
- Double-click the AnyConnect.pkg file.
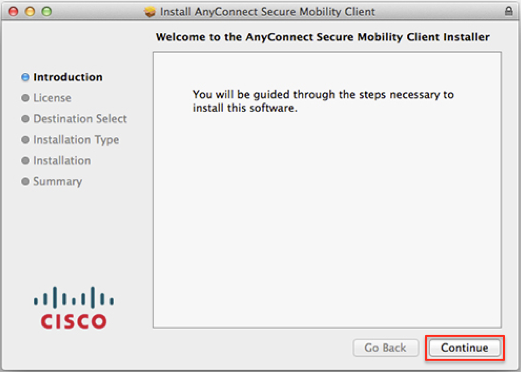
- When the installer opens, click Continue.
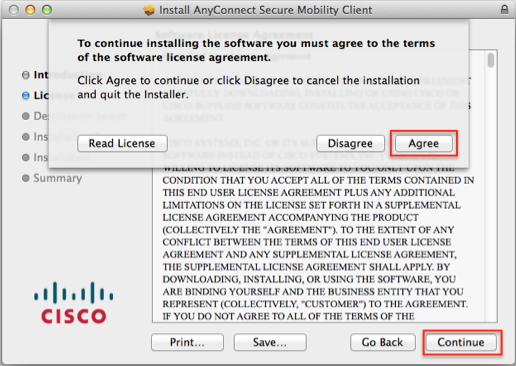
- Click Continue, and agree to indicate that you have read and agree to the end user license agreement.
- Select VPN only.
(The others should be deselected.) If you are unable to proceed at this step, please see the section on installation issues.
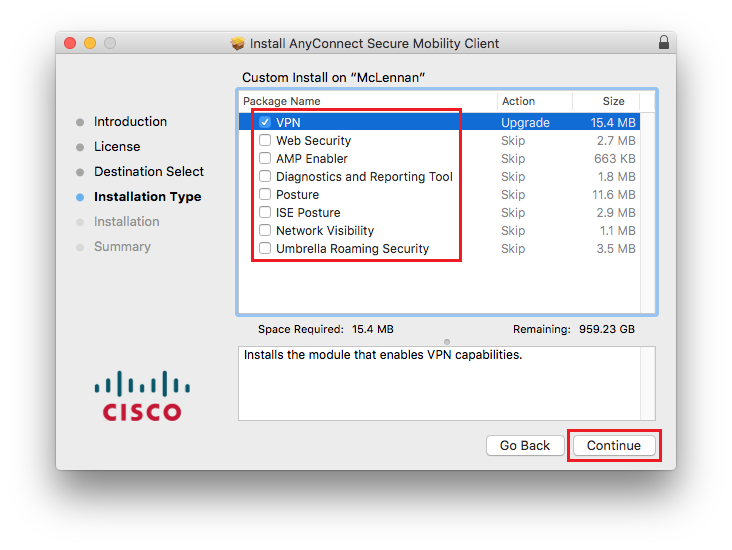
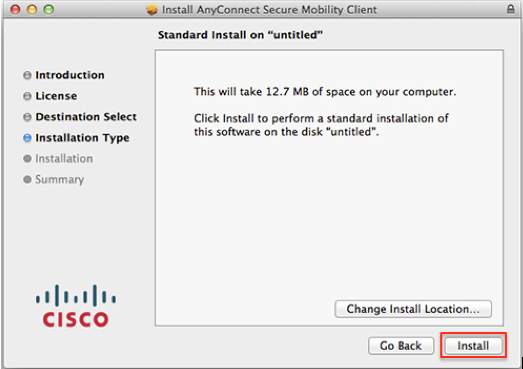
- Click Install.
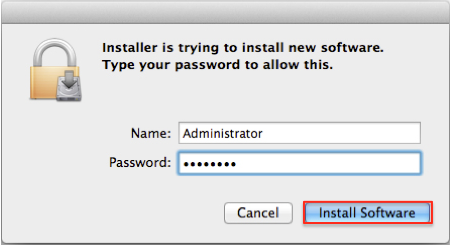
- Enter your macOS administrator credentials, and click Install Software.
- The installation will begin and indicate its progress.
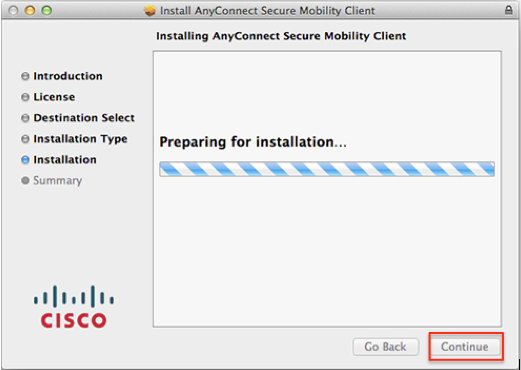
- Click Close when the installation is successful.
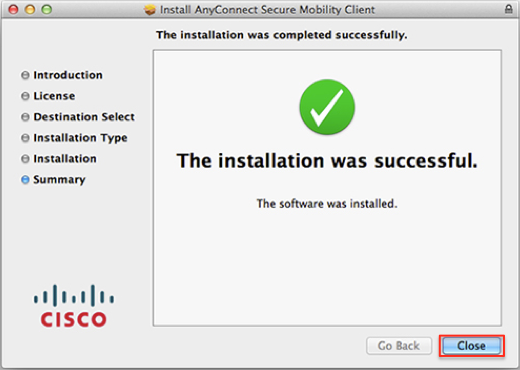
Connect
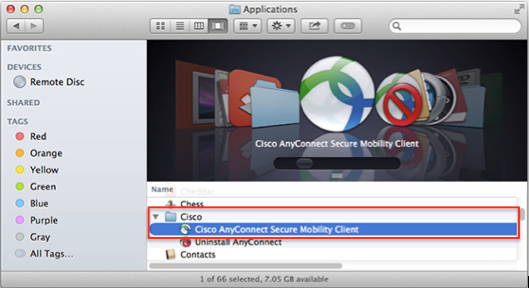
- Open an Applications window by going to the Finder then clicking on Go then Applications.
- Click on the Cisco folder, and double-click on the Cisco AnyConnect Secure Mobility Client.
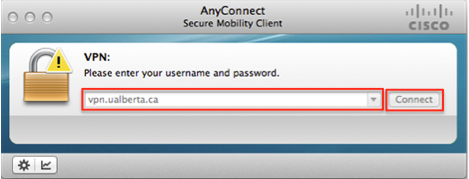
- Type vpn.ualberta.ca in the Cisco AnyConnect Secure Mobility Client dialog box, and click Connect.
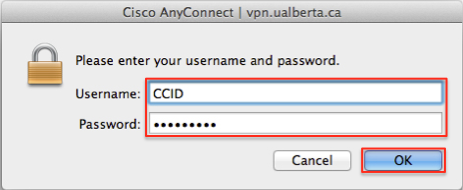
- Enter your CCID and password, and click OK.
- Once you are connected, the window will display the message, Connected to vpn.ualberta.ca.
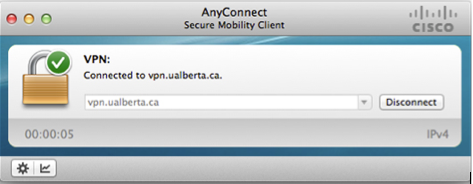
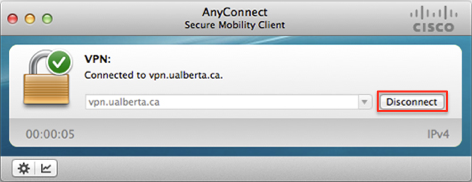
- Remember to disconnect when you are finished. To disconnect, click on the Disconnect button.
Troubleshoot Installation Issues on macOS
Occasionally when installing Cisco AnyConnect on MacOS, all of the installation options will be unchecked and unclickable. This usually occurs when Cisco AnyConnect was previously installed and removed on the system. To fix this error, please complete the following steps (note: these steps require both administrator privileges and the use of sudo commands that could potentially result in unwanted changes if not performed correctly. If you do not have administrator privileges or are not comfortable running sudo commands, please contact the Service Desk at 780-492-9400 to fix this issue.):
- Open Finder, select Applications, and navigate to the Utilities folder.
- From the Utilities folder, select Terminal and open it.
- Run the following command: $ sudo /opt/cisco/anyconnect/bin/vpn_uninstall.sh
- You should now be able to install Cisco AnyConnect following the steps outlined above.
iOS (iPhone & iPad)
Install Cisco AnyConnect VPN
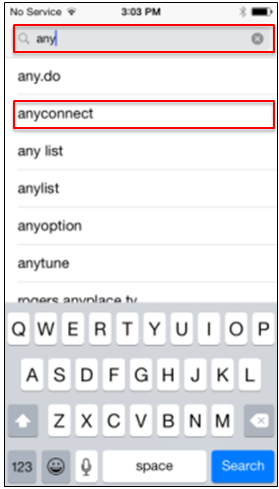
- Search the Apple App Store for anyconnect, and tap anyconnect.
Direct Link
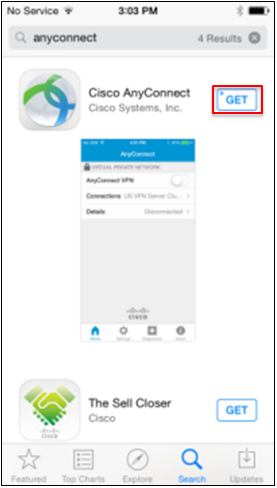
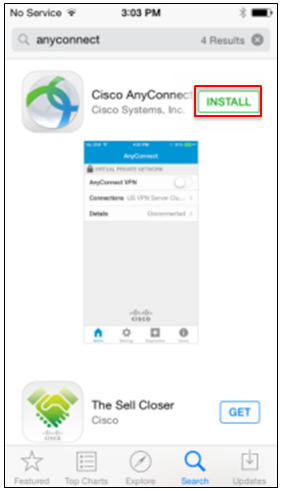
- When Cisco AnyConnect appears, tap on Get.
- Tap on Install.
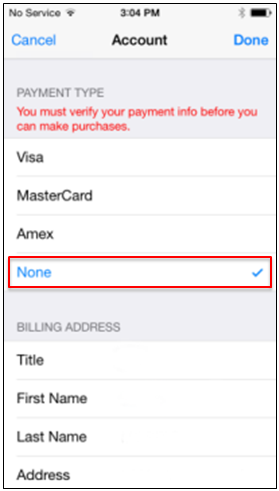
- If payment information is requested, select None.
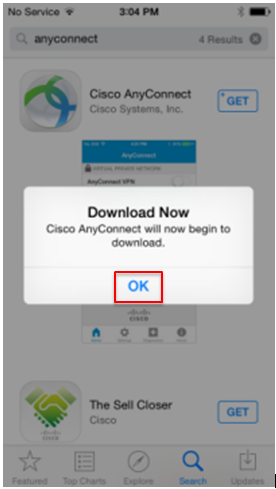
- Tap OK to download the app.
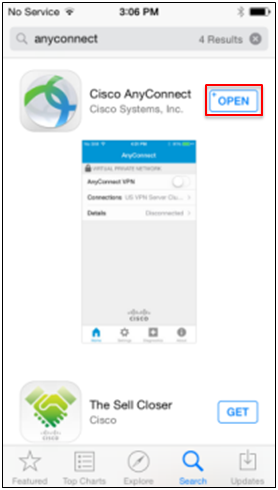
- When the installation is complete, you can tap Open to open the app.
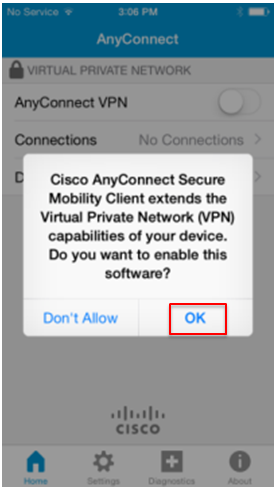
- Tap OK to enable the app.
Set-Up
- If Cisco AnyConnect Secure Mobility Client is not already started, tap the application icon.
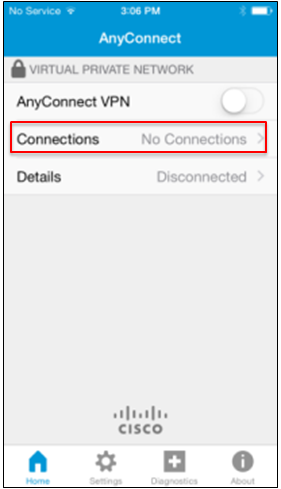
- Tap Connections.
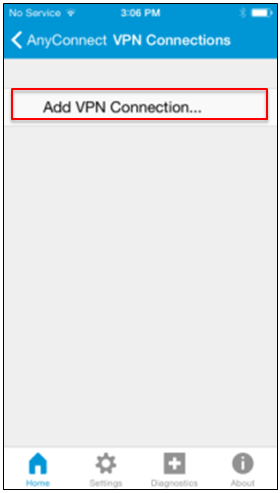
- Tap Add VPN Connection.
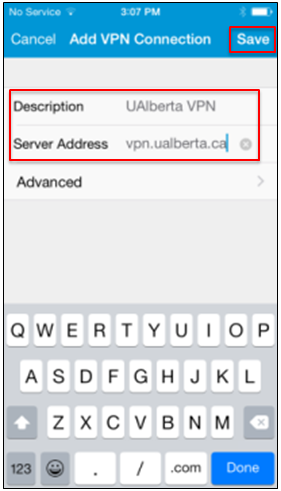
- Add a description of your choice in the Description field and vpn.ualberta.ca to the Server Address field, and tap Save to save the connection.
Connect
- Tap on your new connection.
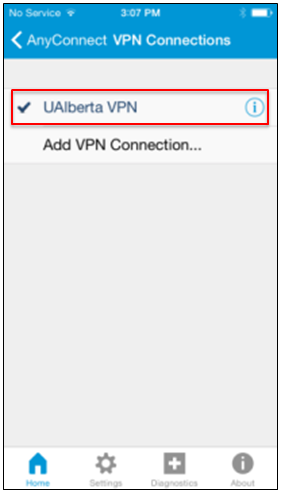
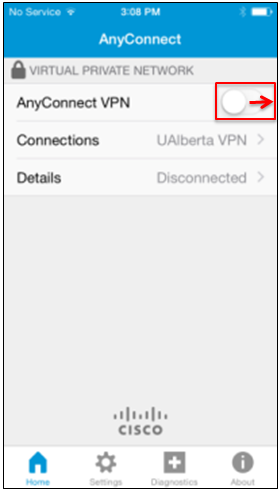
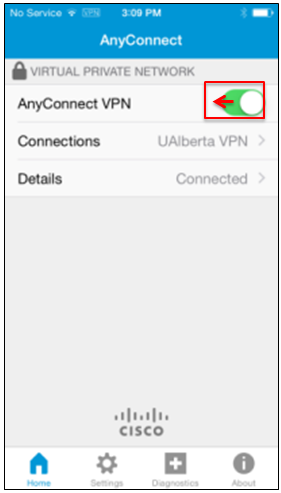
- Swipe the toggle button to the right.
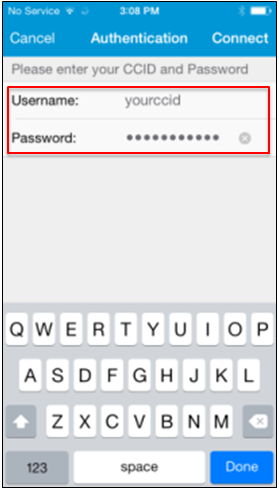
- Enter your CCID and password to authenticate.
- The name of your connection will be displayed, and Details will show you as Connected.
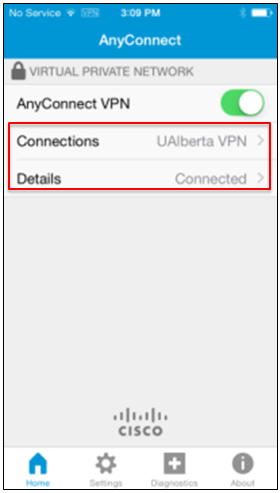
- Remember to disconnect when you are finished. To disconnect, slide the toggle to the left.
Android Mobile Devices
Install Cisco AnyConnect VPN
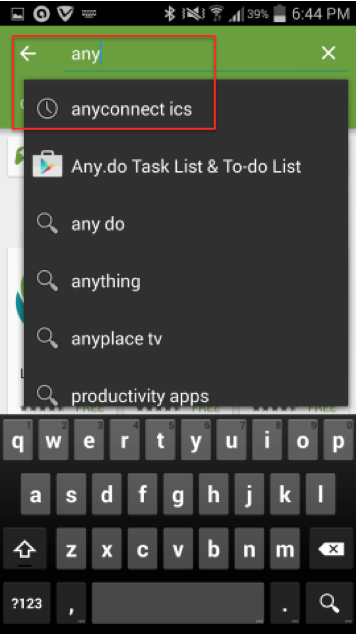
- Open the Google Play store, and search for anyconnect ics.
Direct Link
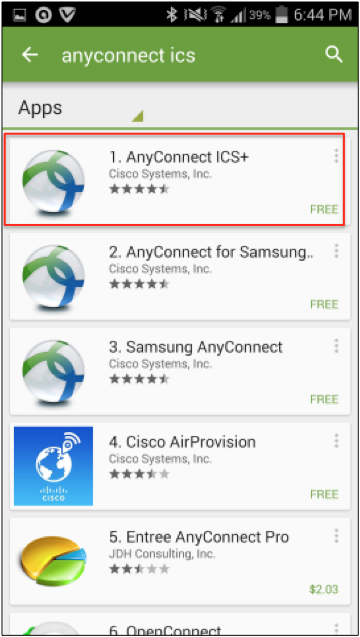
- Select 1. AnyConnect ICS+.
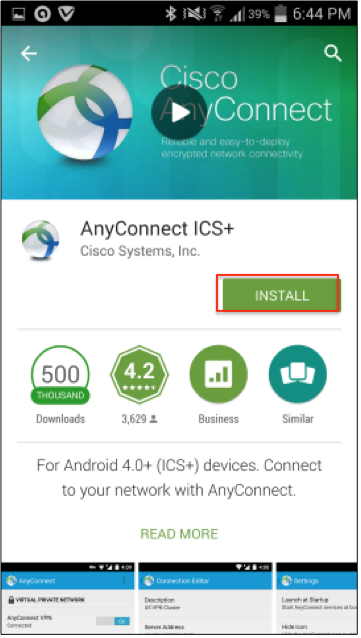
- Tap INSTALL.
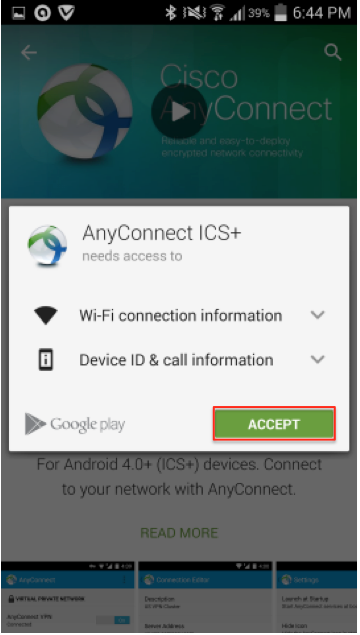
- Tap ACCEPT.
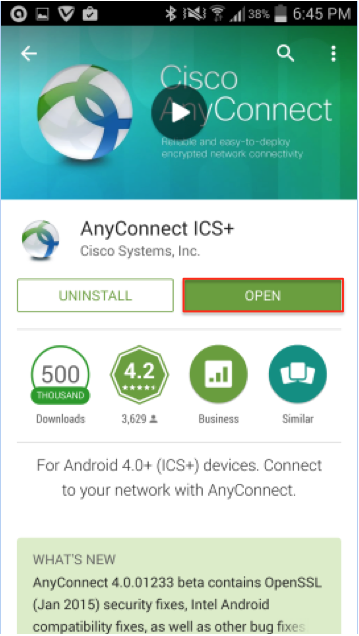
- Tap OPEN.
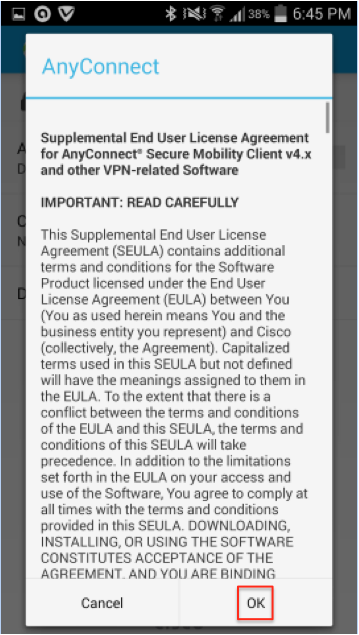
- Read the end-user license agreement, and click OK to accept.
Set-Up
- If Cisco AnyConnect Secure Mobility Client is not already started, tap the application icon.
- Tap Connection.
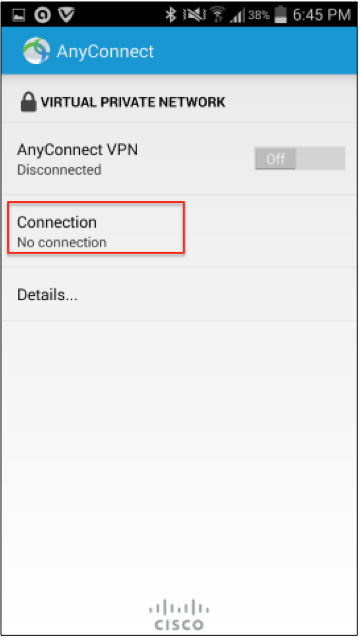
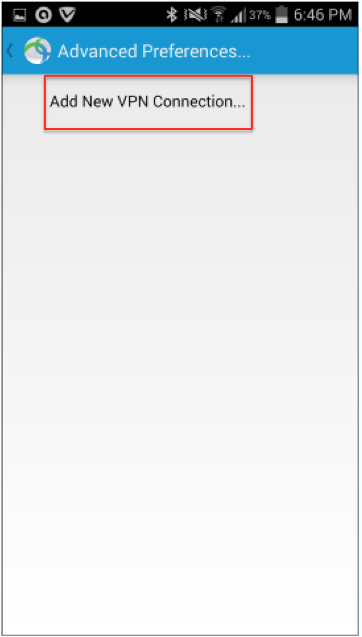
- To continue, tap Add New VPN Connection.
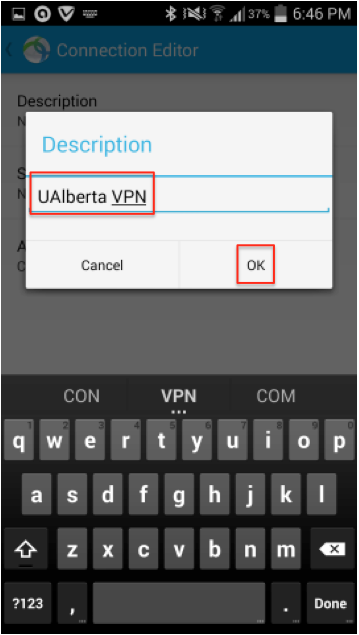
- Add a description for the connection, and tap OK.
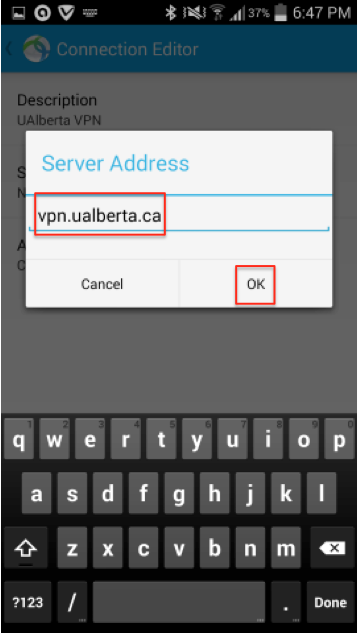
- Enter vpn.ualberta.ca in the Server Address field and tap OK.
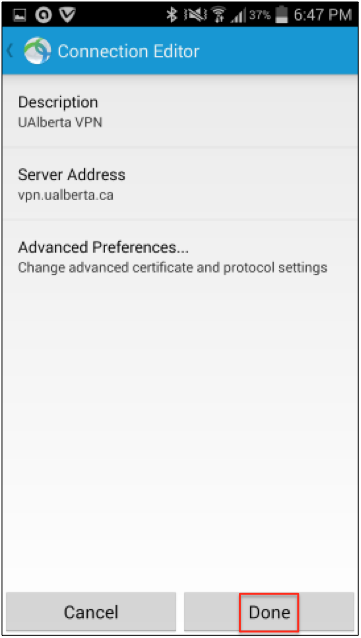
- Tap Done.
Connect
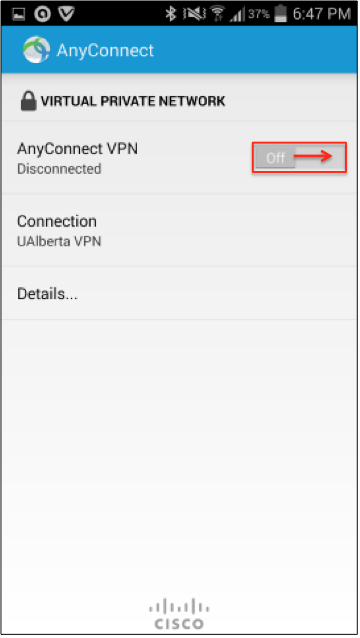
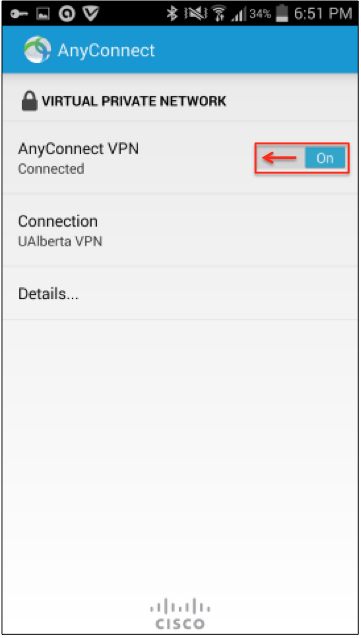
- Slide the AnyConnect VPN toggle to the right to On position:
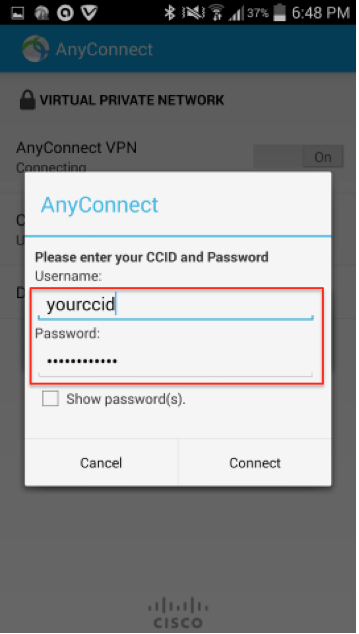
- Enter your CCID and password.
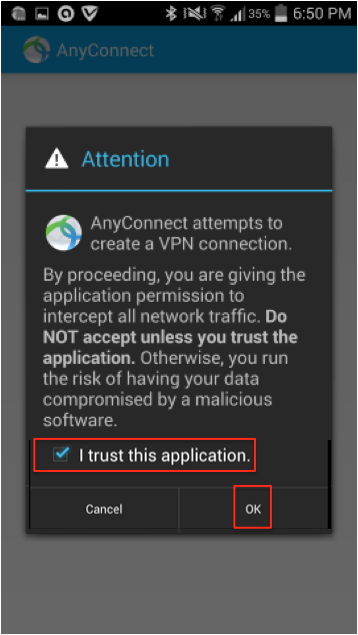
- Verify that AnyConnect is a trusted application by checking the check box and clicking OK.
- The interface will say Connected once you have connected.
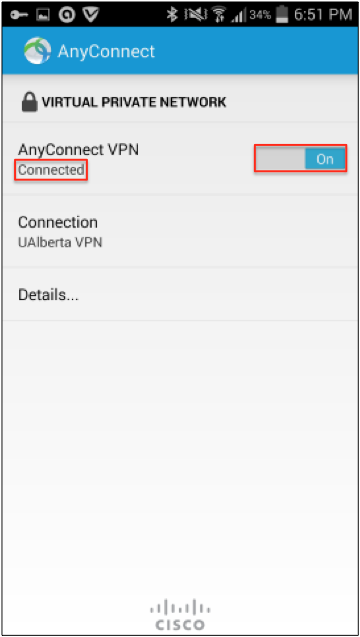
- Remember to disconnect when you are finished. To disconnect, slide the toggle back to the Off position.
Chrome OS
Install Cisco AnyConnect VPN
- Add the Cisco AnyConnect extension from the Chrome App Store by searching for "cisco anyconnect" and clicking Add to Chrome.

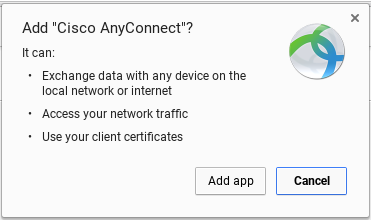
- Click Add app when the permission box appears.
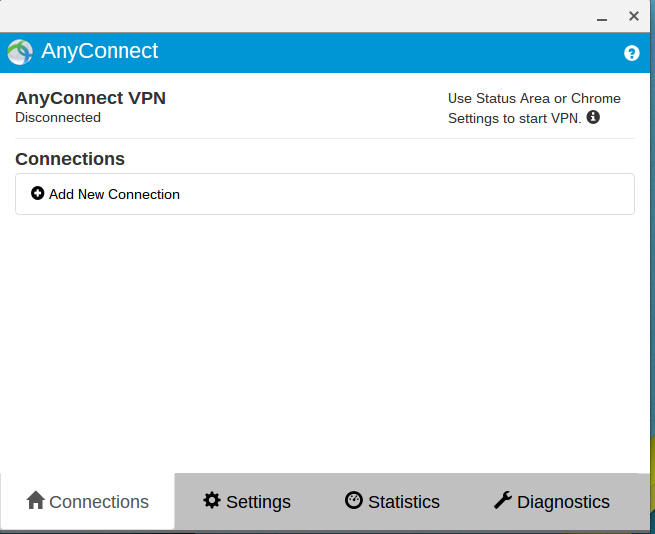
- Click the AnyConnect icon to open the application.

Set-Up
- If this is your first time using the application, a one time initialization is required that may take up to 5 minutes and will say Initializing in the top left.
Once complete, click Add New Connection.
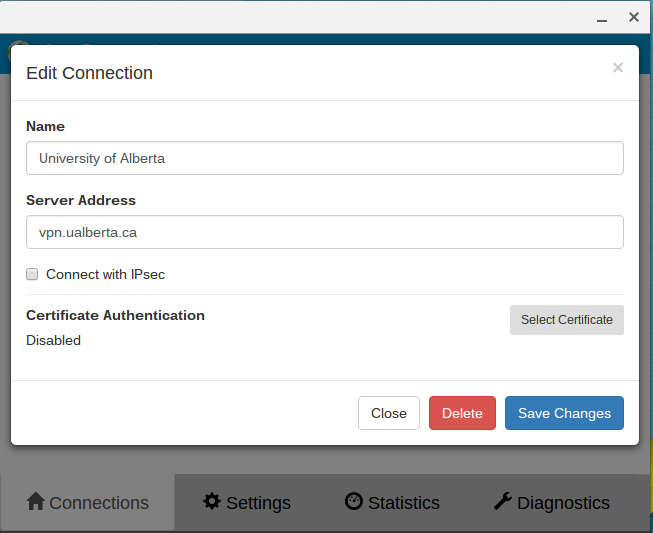
- Enter University of Alberta in the Name field and vpn.ualberta.ca in the Server Address box. Click Save Changes.
Connect
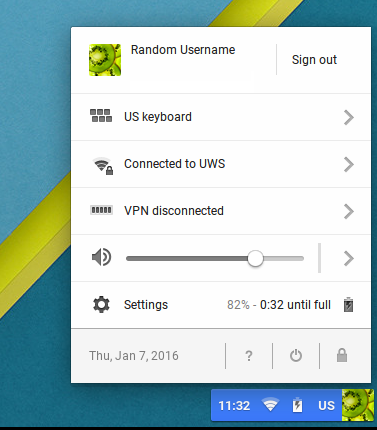
- Click the wifi network icon in the lower right of the screen and then click VPN disconnected.
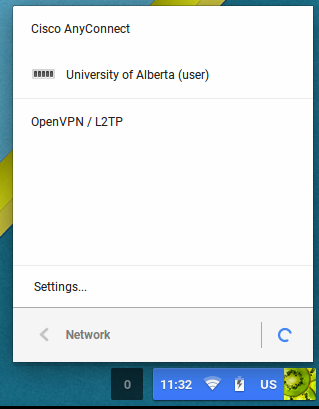
- Under the "Cisco AnyConnect" heading, click University of Alberta.
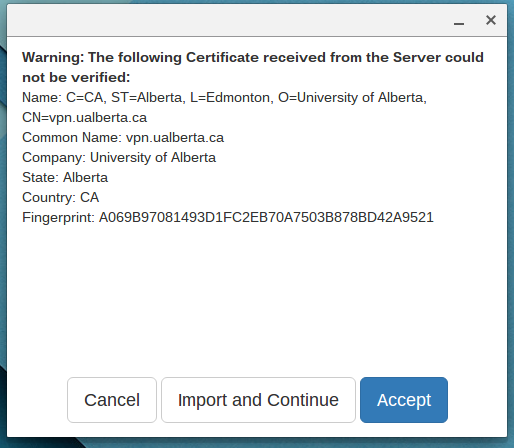
- Confirm that the Fingerprint value matches what is in the screenshot and click Import and Continue.
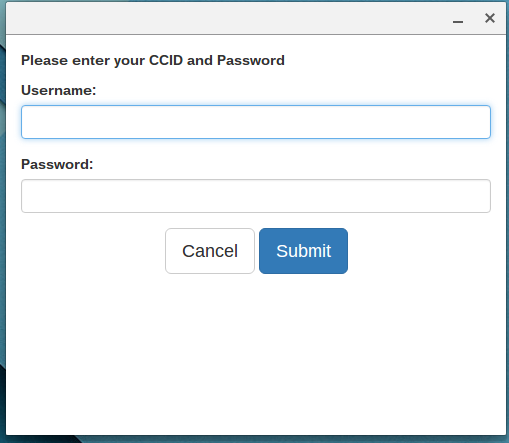
- Enter your CCID and password and then click Submit.
- Click the magnifying glass in the bottom right. Then, click the AnyConnect logo.

- Verify that Connected appears below AnyConnect VPN.
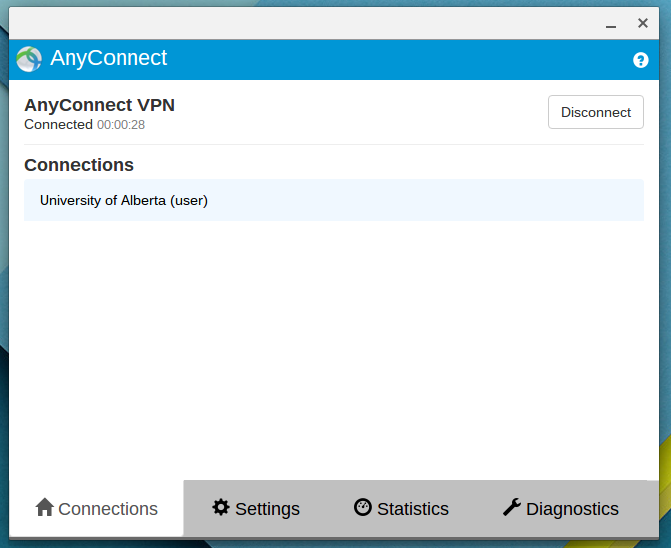
- Remember to disconnect when you are finished. Click the Disconnect button in the top right to disconnect.
Keywords: VPN, download, install, access, linux, windows, apple, ios, android, mac, Virtual Private Network, chromeos, chromebook, chrome